Sew a Sweater for Your E-Reader ~ 3 Easy Designs
March 30, 2012
Third post in my Spring Book series. Previous post was Becoming an (e)Reader, last post is Spring Reads & Inspiration.
Because an e-reader needs a sweater. Don't you think?
We like to make little sweaters for our electronic devices. Adds a little beauty and homemade goodness to these techie devices. I made a cover for Laurent's iPod for his Christmas stocking and Celine sewed her own Kindle cover over a year ago. Then a couple weeks ago I made a cover for my new Kindle.

For all of these projects we used felted sweaters. Sewing stuff with felted sweaters is just so much fun. We keep a stash of old wool sweaters for this very purpose. You never know what you might need to sew. Like a cover for your e-reader!
There's a lot of re-using wool sweater resources out there. One book I read a couple years ago was this one, Sweater Surgery: How to Make New Things with Old Sweaters (Domestic Arts for Crafty Girls). When I went to search at Amazon this morning for this book these others also caught my eye (though I haven't read them personally):
- Heartfelt: 25 Projects for Stitched and Felted Accessories
- Sweater Renewal: Felting Knits into New Sweaters and Accessories
- The Sweater Chop Shop: Sewing One-of-a-kind Creations from Recycled Sweaters
But you don't need to buy a book to make a sweater for your e-reader because I'm going to show you how!
First, you have to felt a sweater. There's like a bazillion tutorials on the web for doing this, if you've written one feel free to leave a link in the comments. I'd love to send traffic your way.

Here's a couple tutorials I googled for you. I'm nice like that, googling things so you don't have to (smile).
So once you have a felted wool sweater you can go about sewing a cover, a sweater as I like to call it, for your e-reader a few different ways.
I'm going to show you three different designs.
1. Super Easy
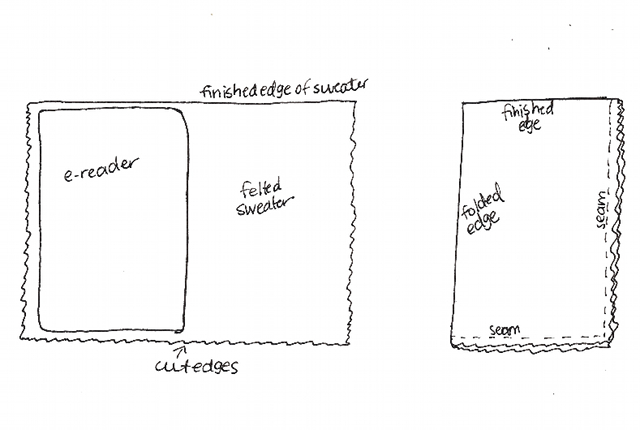
Celine's Kindle sweater is the easiest of all but it does require using a piece of the felt with a finished edge, like the hem of the sweater. And if that hem has a nice design, all the better.
I've sketched the steps for you below. This is about the extent of my drawing talent.
A few notes with this design (and sewing in general):
- This is a very simple project. Three cuts, two seams and your done. Totally my kind of sewing.
- In case it's not obvious the seam allowance (the space between the cut edges the seam) is determined by how snug you want the sweater to fit your e-reader.
- Knits are quite forgiving and have a fair amount of stretch so if you stitch a tad on the tight side and it will still stretch to fit your e-reader. There's no immodesty with a stetched knit sweater on Kindle (smile). My strategy however is to sew larger to start and then sew a closer seam if necessary. I have an allergy to measuring so I do a lot of stitch, adjust, stitch, adjust type sewing. I think this trial and error method is painful to watch for my engineering, technical husband. If you like precision you can use the idea I've sketched above you'll probably get it bang on the first time!
- Celine did this on the machine but it could just as easily be done by hand.

2. Easy
Laurent's iPod sweater is sewn for a small device but the instructions could be adapted for a larger device.
For this design I used leftover scraps from my birthday mittens project. This sweater was so much fun to work with.

The shape is an eloganted rectangle (oh I do love those easy shapes). I could try to describe it but, lucky you, I drew another picture!

A few notes about this design:
- The piece of felt needs to be the length of 2 iPods (or whatever device this is for), plus a litte extra for the button flap.
- I stitched this together with embroidery floss. No machine required.
- I used an outside edge whip stitch in a contrasting color. Doing an outside edge stitch like this requires very little seam allowance. You could use a blanket stitch also.
- Try not to cut your button hole too big (like I did). My button hole stitching is horrific, which is why you don't see a close up photo of it.
3. A Little Bit Tricky (but totally doable)
My Kindle cover was the trickiest of all to sew because I wanted an inside flap to cover the end, unlike Celine's which is open.
It takes me an inordinate amount of time to write detailed, easy to understand instructions so I took photos of each stage and I'm hoping you can piece it together yourself. No pun intended.


And because I just love wool sweaters - such natural beauty, function and versatility (though unfortunately I can't always wear them against my skin) I have to include photos of two of the original sweaters.

PS. We wore the sweaters for a while but found them too tight in some places and itchy in others. So we felted them so we could repurpose them for sewing projects.
PPS. If you liked this tutorial please share it below. I have a nice Pin button to make it easy to add to your Pinterest board. Happy crafting!


